Breakover 2-15-05 Pete Ramey with 2018 edits
Note: If you are
new to hooves and the terminology used here, as a prerequisite,
read the 12-article series
http://www.hoofrehab.com/HorsebackMagazineArticles..html
. Written for lay horse owners, they provide a good introduction
to hoof care and rehab.
The breakover point
on the horse’s foot is the area at the toe that the horse pivots
on and pushes from as the heels leave the ground. It is not
necessarily the farthest-forward part of the foot – think of the
ball of your own foot, which bears the brunt of pushing into the
next stride, vs. your toes, which are actually farther forward,
but doing little-to-no work as you pivot, leap or run.
As with your own
foot, the horse’s natural breakover point is comprised of
hard-callused sole, backed up by bone. This does not mean the
horse’s hoof wall does not do hard work – but the wall is
typically worn or trimmed/rolled back from the breakover point
so that it does not become engaged until a little later in the
stride after initial breakover of the foot.
Many people think of
breakover as occurring only at the center of the toe, but
actually it can occur anywhere around the foot as the horse
turns or navigates uneven terrain. Therefore, the shape of the
breakover point on the horse is round – a projection of the
shape of the coffin bone (P3).
The sole at the
outer periphery of P3 should be allowed to callus into dense
material 5/8”to 3/4" (15-18mm)-thick to accommodate the
incredible forces that occur to the region. Special care must be
taken by the farrier or trimmer not to rob the horses of this
necessary armor during maintenance trims (a true epidemic in the
farrier world), and if a horse has 1/2" (12mm) or less sole
thickness covering the outer periphery of P3, then hoof
protection (my personal favorites are hoof boots with padded
insoles) must be provided when riding, particularly on firm
terrain.
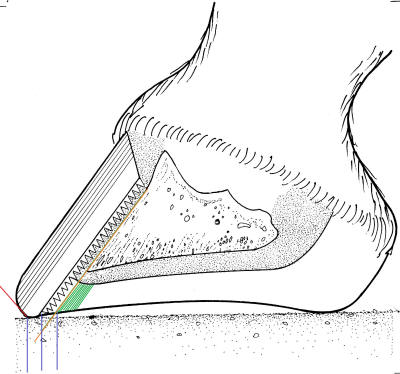
Figure 1
In a healthy hoof
with perfect lamellar connection [Figure 1] setting the correct
breakover point is easy. If you were to project the line of the
dorsal aspect of P3 to the ground (orange line) around the
perimeter of P3, you are simply outlining the sole. In front
feet, measuring from the sole, allow for 1/8” (3mm) of white
line width (the white line – never white in color – is made of
50% epidermal laminae, 50% sole. Thus it is the bond between the
hoof wall and the sole in healthy situations). Allow another
1/8” (3mm) of hoof wall to bear active ground pressure (blue
lines) around the outer perimeter, then roll the wall on a 45-60
degree angle (red line). In other words, with tight lamellar
connection, you simply roll/bevel the walls to achieve natural
breakover for the horse. The densely callused sole around the
outer periphery of P3 (green shading) will still bear the brunt
of the ground force at the toe in most terrain, even though in
these healthy, well-connected feet the wall is technically
sticking out a bit longer and more forward of this rim of
callused sole backed up by the cushioned design of the solar
corium and by bone.
On hind feet with
adequate sole thickness, I generally place breakover all the way
back to, or only 1/8” (3mm) outside the perimeter of this true
sole supported by P3.
This healthy,
natural breakover point allows the horse to move correctly. The
foot can stay on the ground longer (than if the breakover were
farther forward), thus fly lower, farther in a long, efficient
arc. The resulting long stride allows time and extension for the
horse to load the heels at impact, taking premium advantage of
the energy dissipating features built into the foot and each
limb.
Finding and applying
this correct breakover point gets much more complicated, though,
when the hoof walls have become flared or rotated away from the
bone [Figure 2]. The limbs, muscles, ligaments and tendons still
have the same breakover needs for optimal movement and
efficiency. When the toe wall migrates forward of its normal
position around P3, it creates a biomechanical nightmare for the
horse.
The typical result
is that the horse has to step (breakover) a little earlier in
the stride, lifting the foot more steeply to allow time to step
over the longer toe (think of yourself walking in swim fins) and
to avoid the pain involved in this now-increased stress and
lever forces on the laminae. This generally alters the whole
stride into a higher, shorter arc causing the foot to land
toe-first because there is not enough stride extension for the
horse to load the heels. Toe-first impact is one of the primary
causes of toe flare and hoof capsule rotation – so a viscous
cycle is created. The flip side of this is that the number one
trick to growing out wall flare and hoof capsule rotation is
achieving flat impacts at the walk and heel-first impacts at
faster gaits. This means you will have to optimize breakover on
these horses to eventually grow in well-connected walls.
Alternately, as the
pain of separating laminae becomes more severe, the horse might
start to avoid breakover completely, keeping the feet out front
at all times, exaggerating the heel load. This is a defense
mechanism that takes stress off the separating toe wall and thus
the laminae. Again, in this case, the same trim relieves lever
forces on the toe wall, usually eliminating the need for the
horse to stretch back in this “founder stance” or move in this
pattern. This is also helpful for growing in well-connected new
laminae.
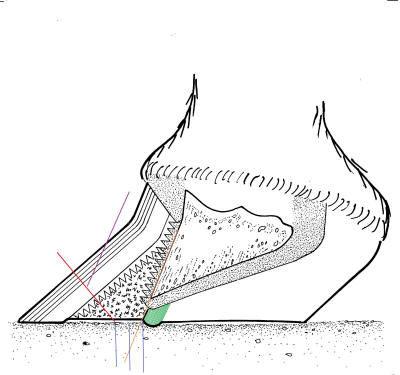
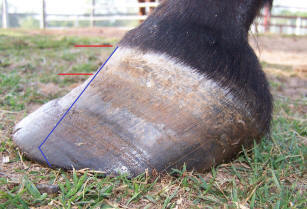
Figure 2
The lamellar wedge –
the area between the now separated hoof wall and P3 varies
dramatically in its texture and integrity. Sometimes it is an
air space or bacteria-infested mush, sometimes it is made of
harder material than the sole, sometimes it is anywhere
in-between those extremes. Occasionally, all or part of the
lamellar wedge is covered over by old sole material which has
been distorted forward of proper support by P3. But the callused
outer periphery of the sole – the tough “extension” of P3 (green
shading) is generally still in the same spot relative to P3.
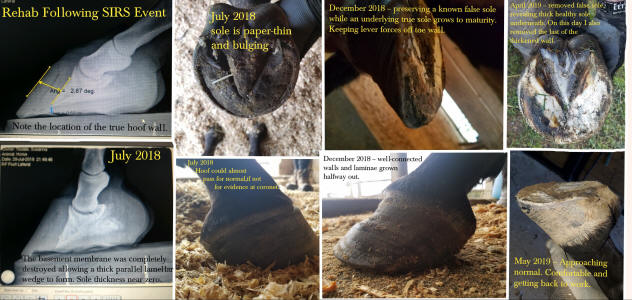
Using radiographs, or often you can simply see the difference
between the textures and colors of the true sole and the
lamellar wedge, try to locate the border between the true sole
and the lamellar wedge material. If you can find it,
biomechanically, this should be the breakover point, with the
roll beginning 1/4" outside that perimeter (blue lines) to
protect the corium. Assuming the sole is of adequate thickness
(over 1/2"- or 12mm-thick), the wall and lamellar wedge should
be trimmed from this point with the nipper or rasp held on the
angle of a normally rolled wall (red line in Figure 2).
BUT… If the sole is
thin, I cheat the breakover forward by 1/2”-5/8” (12-15mm)
simply to leave extra padding out front. Optimizing breakover on
a thin-soled horse often leads to overexposure of the dermis,
then bruising, then abscessing and P3 remodeling… not worth the
potential gain. If an appliance is being added, whether a boot
or shoe, then go ahead and optimize breakover on that appliance
– but don’t do so on the foot until the sole is 5/8”
(15mm)-thick or more.
The reasons behind
optimizing breakover in a case like this are, 1) improve overall
stride to get the horse loading flat/heel-first so that
well-connected walls/laminae can be grown, and 2) to relieve the
lever forces prying away at the lamellar connection so that
well-connected walls/laminae can be grown. If you manage to get
the breakover back far enough to achieve those two goals, it is
back far enough – no need to increase risk to the corium by
bringing it back farther when the soles are thin.
Trim more often,
rather than taking the risks associated with over-trimming. Trim
just enough to keep the new growth at the coronet from levering
away from the bone during the next 3-4 weeks. Then come back 3-4
weeks later and do it again. If, instead, you trim so much wall
that lever forces will be relieved for 8 or more weeks, the
likelihood of increased pain and corium damage increases.
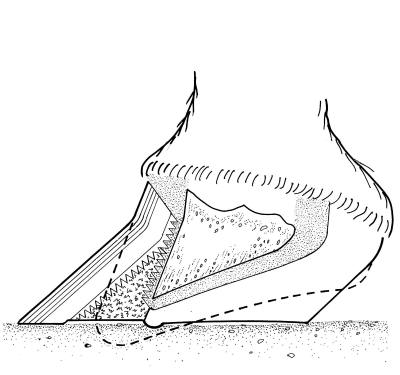
Figure 3
Eventually, this is
the goal: [Figure 3] to grow in a normal wall/lamellar
connection around the existing P3 (dashed line). There will, of
course, need to be very careful heel work done and probably
sweeping nutritional changes needed to achieve this, but keeping
the breakover trimmed correctly along the way is a big part of
success with these cases.
See the articles
http://www.hoofrehab.com/HeelHeight.html
and
http://www.hoofrehab.com/Diet.html
Important note: In a
rotated or severely flared hoof, do not trim the dorsal wall to
the dotted line in Figure 3 – wait for the new well-connected
growth. Instead, top dress the dorsal wall similar to the purple
line in Figure 2. In order for the generally weaker lamellar
wedge material to protect the dermis as well as a healthy hoof
wall would, it needs to be about twice the thickness of normal
hoof wall. Trimming the lamellar wedge down to normal wall
thickness (1/2”-5/8” or 12-15mm) overexposes the dermis to
damage.

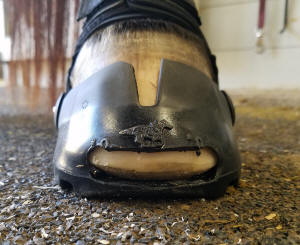
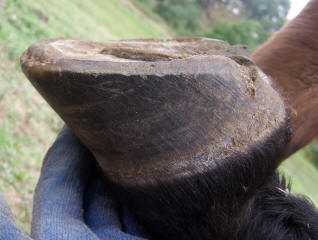
Figures 4 and 5
On rotated, flared or exceptionally low angled hooves, any boots or shoes applied should have the breakover modified to optimize movement and efficiency. With hoof boots, in some cases this can be achieved by rasping a more aggressive breakover into the boot tread. In more severe cases, heat-fitting and/or toe-slotting Easyboot Gloves may be required. See http://hoofrehab.com/GloveMod.html
Looking for texture
and color differences on the bottom of the foot is often
effective for locating the true sole supported by P3. Careful
though, some soles have striped pigmentation. Don’t make
breakover decisions based on color alone – look for the texture
and prominence as well. Some lamellar wedges are tougher than
the sole and will be protruding past it. Other lamellar wedges
are softer than the sole and will have worn off passive to the
sole. Use lateral radiographs, as well, to help you determine
where each tissue grew from. If you draw a line down the dorsal
aspect of P3, generally the tissue behind the line is true sole
and the tissue between the line and the wall is lamellar wedge
material.
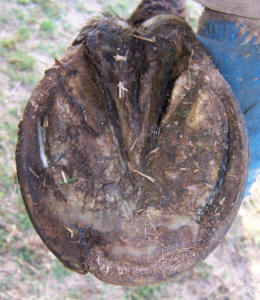

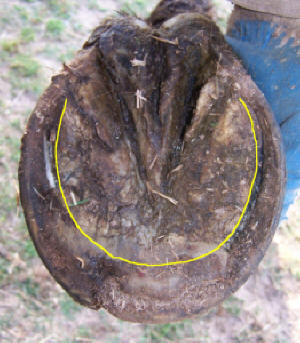
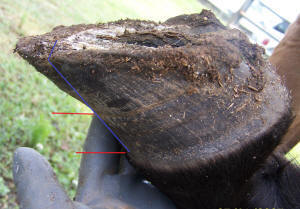
Figures 6 and 7

Figures 8 and 9
In Figures 6, 7 and
8, it is easy to see the boundary between the true sole and the
lamellar wedge (yellow line). If the sole is over 1/2”
(12mm)-thick, breakover should be brought back to 1/4" (6mm) in
front of the true sole, well into the lamellar wedge material
(Figure 9). Warning: this horse will need 24/7 boots with padded
insoles and/or soft terrain until well-connected wall has been
grown.
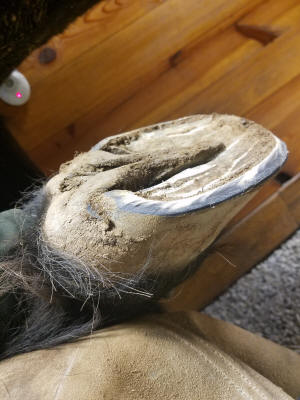
Figures 10 and 11
Five months later
(Figure10 and 11), the walls have grown in much
better-connected. Now getting breakover right only involves
rolling the wall – the lamellar wedge is almost gone.
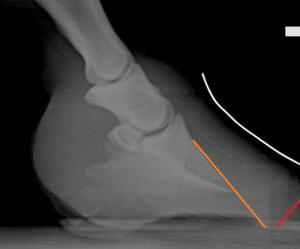
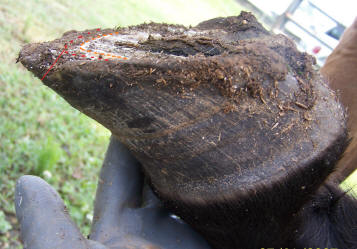
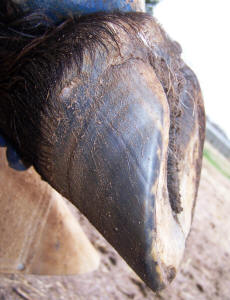
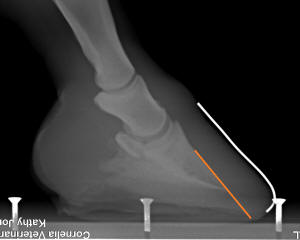
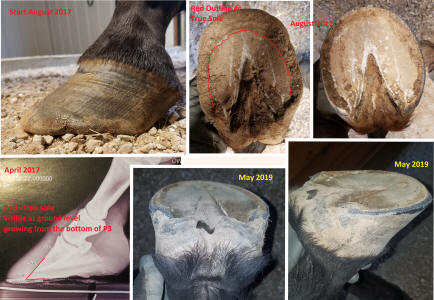
Figures 12 and 13
Combining
Radiographs and Visual Indicators to find the True Sole,
Supported by P3
The foot in Figures
12 and 13 has an obvious line between the true sole (outlined by
orange dots in photo) and the lamellar wedge (black, weak,
infected). The radiograph confirms the presence of the lamellar
wedge to erase any doubt about the hoof capsule rotation present
here.
By projecting the
dorsal aspect of P3 to the ground (orange line on radiograph,
orange dots in photo), then moving forward 1/2" (6mm) (red
dotted line), the natural breakover around P3 can be created
(red line in radiograph and photo).
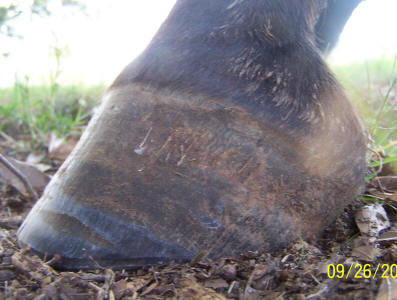
Figures 14 and 15
Five months later,
as the well-connected walls and laminae grow in, breakover can
be optimized by simply rolling the wall. The “right” breakover
point has not changed at all throughout treatment, though the
application of it has changed dramatically.

Figure 16
Remember that when the sole is thin it is a
mistake to optimize breakover when trimming the foot. Whether by
projecting the dorsal aspect of P3 to the ground (blue line) or
by seeing the boundary between the true sole and the lamellar
wedge, if you move forward 1/4" (6mm) from the true sole line
and place breakover (yellow line), the corium (red line) will be
overexposed to impact trauma. Instead, cheat the breakover
1/2"-5/8” (12-15mm) farther forward (green line) until the sole
thickens. During this time, of course, be sure no one is
trimming the sole – this is too common.
Alternate Methods
for Finding the Natural Breakover Point
In horses, the apex
(front of) of the frog consistently grows/originates from a
point 1/2" (12mm) or so behind the tip of P3 (not true in
donkeys and some mules). So – to an extent – in horses, the apex
of the frog and overall frog length can be helpful in finding
the natural breakover point when there are no fresh radiographs
and when you cannot see a distinct line between the sole and the
lamellar wedge (which is an indicator of P3 remodeling). Note:
when measuring to the apex of the frog, be sure to measure to
the bottom of the collateral groove (the tight seam between the
frog and sole), ignoring any overhanging flap of frog material.
If you measure the
overall frog length (including the bulbs) in most horses, then
divide that number by three, the resulting measurement is
approximately the distance from the leading edge of the true
sole to the apex of the frog, so very close to where the
breakover should be located. There are exceptions to this:
· Healthy development of the lateral cartilages and digital cushions makes the frog larger/longer in proportion to the size of P3.
·
There is some
individual variance from horse to horse of where on P3 the frog
corium originates.
·
Distal descent of P3
can elongate the frog.
·
Horses with P3
remodeling (bone loss at the outer periphery and/or ski-tipping)
generally have the tissue of the frog apex originating closer to
the forward edge of (or even in front of) P3.
·
Under-run distortion
of the hoof capsule and heel bulbs can artificially elongate the
back of the frog, thus the overall frog length.
Each of these exceptions makes setting
breakover 1/3 of the frog length in front of the frog too
conservative or too far forward. But this means, at least, that
this ratio is a good place to start when you have no
other indicators. Again, when the soles are thin [collateral
groove height less than 1/2" (12mm) off the ground], don’t
optimize the breakover. Instead set breakover at half the
total frog length in front of the apex of the frog as a very
safe starting point.
Figures 17 and 18
Another useful tool
to help find this same breakover point is to project (not cut!)
the upper 1” (25mm) of new wall growth to the ground, then add
the typical 45-60 degree roll to the lower portion, simulating
the dimensions of a normal “mustang roll” on the wall. In
Figures 17 and 18, using the same hooves previously discussed,
if you project the angle of the upper 1” (or more) of new growth
to the ground (blue lines) it will approximate the same
breakover point, unless that upper growth is also rotated. Even
then, it will get you closer than if you simply rolled the
existing rotated wall at ground level.
Don’t use less than
1” of growth for this projection! The coronet can bend, distort,
and thus trick you into being too aggressive if you try to do
this with a shorter length of new hoof growth.
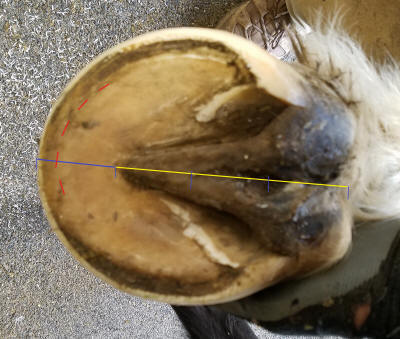
Figure 19
Using all of the
above indicators in unison is considerably more accurate than
using any one of them alone. In the foot in Figure 19, I set
breakover at 1/3 of the frog length in front of the apex of the
frog (blue vs. yellow lines). This helped me notice a very
subtle sole/lamellar wedge line (red dashed line) I might
otherwise have overlooked.
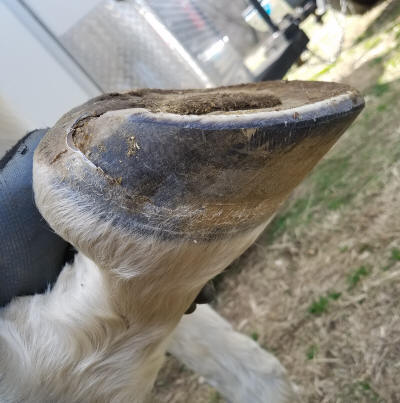
Figure 20
Be willing to go
outside the box, rather than blindly following methodology. The
Thoroughbred above has a thin sole and is getting much of its
vertical depth/height off the ground from a proud rim of
lamellar wedge around the outer periphery. Don’t bring breakover
back so far that you would lose vertical height/depth. Remember
that the reason for optimizing the breakover is correct and
comfortable movement. This trim achieved these for the horse,
while also providing more protection for the corium than it
would have if I had brought breakover back farther.
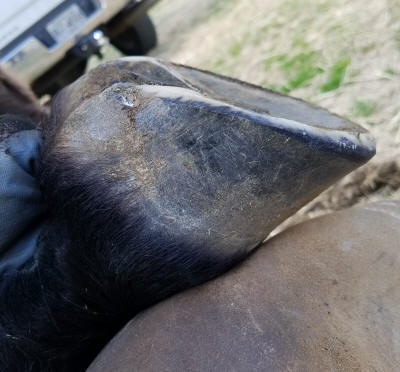
Figure 21
With bare feet, from
10:00 to 2:00 around the toe, horses seem to care very little
about whether hoof wall is standing longer than the sole. In
this region, if the soles are of healthy thickness, it is
generally safe to bring breakover back so that the walls appear
unloaded when the horse is standing on a hard, flat surface. I
believe this is because horses don’t actually need a toe wall
for standing still on a hard surface – they need a toe wall when
they are propelling themselves along through their home and work
terrain. So a foot with the breakover trimmed as in Figure 21
has a very active hoof wall engaged after breakover when the
foot is tilted up higher and the horse is pushing off the toes.
But from 10:00 to
2:00, back, horses do seem to care more about whether wall is
sticking up past the sole. It is much more likely that you will
make a horse tenderfooted if you don’t leave 1/8”-1/4” (3-6mm)
of wall standing past the sole at the quarters and heels.
There is a time and
place to unload big quarter flares – this is just to say that it
cannot be done nearly as routinely as at the toe.
Important note:
When hooves are bare, booted, have tape-on pads, epoxies and
with some thoughtful glue-on applications, the solar corium
receives huge loads from impact through breakover, and a 100%
release of that load when the foot is in flight – this is the
natural way the sole should be loaded and does not seem to cause
a lot of problems. But beware of shoeing with sole pressure, as
this pressure is “clamped on,” so is not fully released during
hoof flight. The solar corium, like all living tissue is quickly
damaged by constant pressure without release.

Figures 22 and 23
Another variance I
commonly need to do occurs when a foot has wholesale wall flare
all the way around the foot, or at least one big quarter flare
along with a toe flare or hoof capsule rotation. In the foot in
the Figures 22 and 23, if you trimmed aggressively to try to
grow out the rotation, and both quarter flares during the same
visit, the horse would almost certainly be lamed and in danger
of bruising of the corium, particularly if any of the horse’s
terrain was firm or rocky. Even worse, the resulting
compensative movement would probably make growing in
well-connected walls impossible, anyway. So instead of trying to
do it all at once, I find it important to “pick my battles.” In
this case, I felt that toe-first impact and discomfort caused by
the rotated toe wall was causing the primary problems. So from
10:00 to 2:00 around the toe, I optimized the breakover.
At the quarter walls
and heels, I took a more passive approach – I left the walls
standing well past the sole and just rolled/beveled their entire
width. Remember the real secret to growing out wall flare is
flat and/or heel-first impact, anyway.
The result of being
aggressive with the toe wall and more conservative with the
quarter walls is a “squared off” look that I am generally not a
fan of. In this case, though, it is the right thing to do. At
some future trim, when I am not making a big breakover change, I
might “pick another battle” and go more aggressively after one
or both of the wall flares. Eventually, when well-connected
walls/laminae have been grown in everywhere, the foot will be
round – following the shape of P3. But this method is often a
very important means to that end.
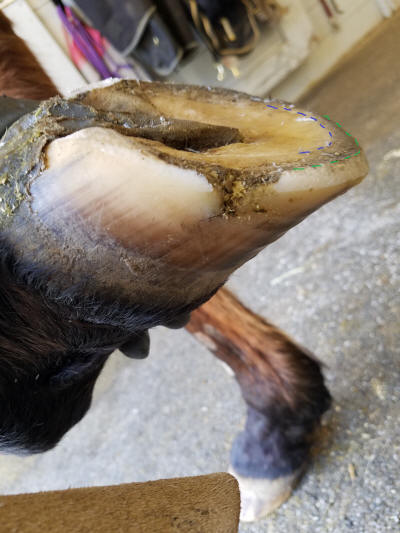
Figure 24
In this foot, the border between the true sole and the
lamellar wedge is marked by the blue dashed line – this horse
has about a 10 degree hoof capsule rotation. Everything between
the blue line and the wall (green line) is lamellar wedge
material. This photo shows a variation to trimming I commonly
use when soles are moderately thin – 3/8” (9mm). To leave
adequate protection for the corium while simultaneously
optimizing breakover, I place a slight bevel on the entire width
of the lamellar wedge (10-30 degrees, depending on how close the
solar corium is to the outdoors). Then the wall is rolled
normally. Notice the sole was not touched, but was allowed to
keep all callusing and thickness. This horse is comfortable
barefoot in the turnout environment and ridden in boots with
padded insoles while I grow out the rotation and wall cracks.
The breakover point is back at the supported sole (blue line),
while adequate armor is left out front.
Alterations
Aside from normal or natural breakover discussed here, there is
a long list of issues – really any injury or biomechanical
problem a horse might have – in which altering or exaggerating
the breakover farther back might help the horse move better.
These generally warrant experimentation and careful scrutiny of
the horse’s movement to find the “right spot” for breakover. I
caution you again, though, to do these alterations on the
appliances you use, whether nail-on, glue-on, epoxies,
urethanes, or boots. It is important that you not over-trim the
foot itself in the name of some other issue the horse has. Don’t
trim sole unless, perhaps, it is over 5/8"(15mm)-thick and leave
at least 1/2" (12mm) thickness of good, solid hoof wall or 1”
(25mm) of lamellar wedge out front to simply pad the corium from
impact trauma. And if you find less material than this already
present upon your initial visit, be sure to treat the horse as
compromised – provide protection in some form, and/or make sure
the terrain is soft, until the protective tissue has reached
these adequate thicknesses.
All photos are from
Pete Ramey’s files or from the book
Care and Rehabilitation of the Equine Foot. Black
and white line drawings by Karen Sullivan – color graffiti added
to them by Pete.
*
*